
In my early days of leatherwork, I had no proper concept of the most important basic leather techniques and as such had my focus on the “wrong” techniques which would have either way come more naturally. I have had a few queries on this topic and so in this article, I sought to help you with the most basic leather techniques you’d need starting out in Leatherwork.
So, what are the most basic leather techniques? The most essential basic leather techniques for beginners are;
- Leather Selection and Storage
- Cutting Leather
- Coloring Leather
- Skiving Leather
- Gluing Leather
- Burnishing Leather
- Saddle Stitching
- Applying Finishing to Leather
- Cleaning and Conditioning Leather
In addition to the above list, we also discussed the details of what these skills mean and the various reasons why they are the very basic necessary leather skills for beginners to know and focus on right from the beginning of their journey in leatherwork. Keep reading to find out more.
1. Leather Selection and Storage
As simple as this may seem, most beginners get this part wrong. When you’re starting out in leatherwork, you’re best bet in leather choice is to go for an economy-grade leather and later upgrade to more expensive grade once you have gained experience.
While purchasing quality leather might not be the best option, a few of the most important things to know in leather selection is;
- Leather is priced by the square foot be it the side, shoulder or any other parts you decide to go for. If you’re however confused about the parts of the leather to go for, you should know that most of the leather projects you’ll start out with can be cut from a double shoulder hide.
- Another thing to consider is your intended use for the leather and shape of the hide as a whole. For example, if you will work on a project that’s long and narrow like a belt or strap, you’ll need to be able to cut it all in one piece.
- Examine the leather carefully as most natural leather, especially full-grained leathers will always come with some form of defects like scars and spots. Picture how you can creatively work around the defects or how well you can integrate what may appear as a defect as part of the design of your leather project.
- The best way to store your purchase leather will be to store it loosely rolled with the grain side facing inward and place in a cool dry place. You can also roll it up the same way in a brown or newspaper because these type of papers are very porous and reacts well with leather.
Beginner Leather Projects and Specific Leather Weights Needed
Generally, when starting out, you will start out with very simple projects and here they are with specific leather weights or leather thickness you’ll need to get.
Pro Tip: The thickness of leather, in general, is measured in ounces(oz).
- Key Holder/ fob – 4 to 5 oz leather
- Card Holders – 4 to 5 oz leather
- Belts – 7 to10 oz leather
- leash for pets – 7 to 8 oz leather
- Cellphone Case – 4 to 5 oz leather
- Wallets – 4 to 5 oz leather
Pro Tip: The least expensive part of hide or leather is the part from the belly region and is prone to stretching.
Selecting the right kind of leather starting out is an important leatherwork skill you will get used to as time goes by. Do well to interact with the shop or sales assistant where ever you’d choose to buy your leather and feel free to ask questions, they love it and will give you the best options they may have.
2. Cutting Leather
Cutting is an essential skill in leatherwork and forms part of the most activities you’ll be doing. Cutting is indeed important and it can be achieved using different kinds of cutting tools and some common ones include the rotary cutters, utility knives, round knives, etc.
While you will soon be able to figure out cutting tools that feel most comfortable and give you the best cut, in the meantime, the best cutting tools I will recommend for a beginner are the rotary cutter for cutting thin 1 – 2oz leathers and a utility knife for thick leathers. Here are a few useful videos on how to use the above cutting tools to cut leather;
Rotary Cutter:
The rotary knife is indeed one of the best cutting tools you could start with for all garment weight and upholstery weight leather but not so ideal for heavier leathers. It’s particularly a great tool for making straight cuts.
Cuts can be made either by pushing or drawing the blade. The downside you would expect with this cutting tool is that its hard to cut tight corners and its blades do not particularly come off as ones you can easily sharpen.
Watch a video on: How to Use a Rotary Cutter
Utility Knife
My personal favorite is the utility knife and I bet you will also like and use this quite a lot. It’s also known as the box cutter and you will be able to use the utility knife for all types of cutting especially intricate and tight corner cuts you might not be able to do with the rotary cutter
.This cutting tool will help you out a lot as they are very easy to use, super comfortable and have very sharp replaceable blades.
Watch a video on: How to Use a Utility Knife
3. Coloring Leather
Leather can be colored by using leather colorants to dye or stain it to make it look more attractive. This may not be the case for all types of leather as in some instances you would just want to maintain the natural color the leather comes with.
The process of coloring leather, for example, dyeing can be very tricky yet, it’s one of the most important skills you would have to focus on mastering early on in leatherwork. I can assure you most people, with myself included are still working on this technique to this day so you’re not alone on this.
Applying a layer of dye is really fun but done get carried away as getting a nice even coat of dye on leather may take you a while and a lot of practice. So the earlier you begin experimenting with coloring leather, the better. This is why we include it as a vital technique for beginners.
There are different ways of dyeing leather and below is a sample video to show you how it’s done.
Watch a video on How to Dye Leather
4. Skiving Leather
This may stand out as somewhat an odd skill but from my experience, I find it a very useful skill to master when starting out in leatherwork. It’s a very simple activity of reducing the thickness of leather either prior to joining two or more pieces of leather together or just to even out the thickness of leather. Skiving can be done on the edges of the leather or the main parts of the leather.
Although skiving leather can be a bit hard for an absolute beginner, having a fairly good skiving tool greatly makes a huge difference in the quality of skiving you will do. And Yes! you guess right, its called a Skiving knife.
Watch a video on How to Use Skive Leather
You can also check out an article I wrote earlier on the best skiving knives for leather.
5. Gluing Leather
I once tried a leather project (wallet) in college where I challenged myself not to use glue. Although it was possible, it was really hard and the whole project took forever to complete with a lot of imperfections. So the truth is that you will do a lot of gluing in almost every project.
Gluing as the name implies refers to joining two or more pieces of leather together and it’s indeed an essential technique for beginners. There is a lot of ready-made glue ideal for leather. They also come in different kinds but the more common and affordable ones are the contact cement glue and the white glue.
You will use the white glue if you only need a temporary bond just to tack for sewing or lacing. The cement glue is used for more permanent bonds and doesn’t require sewing if you prefer not to sew. However, when using this type of glue, you would have to apply it to both sides of the leather you’re gluing and wait it out for the glue to dry before putting it together. Contact cement creates the most durable bonds.
Here’s a short video on: How to Glue Leather
Here’s also a detailed article I wrote earlier on the best types of glue for leather. It’s also a very useful guide for selecting the best kind of leather glue.
6. Burnishing Leather
Probably one of the easiest basic techniques in leatherwork, burnishing is the process of running a piece of canvas cloth, wooden slicker or a burnisher over the grain surface or edges of the leather to make is smooth, glossy or glassy to enhance the aesthetic appeal and also to protect the leather.
This is an important technique for beginners because it’s a double as a decorative technique, a protective treatment, and a professional touch even if you’re just starting out.
You can check out more information about burnishing in my earlier post on Leather Burnishers: Best Types, Techniques, Tips, etc.
Here’s a sample video on How to Burnish the Edges of Leather
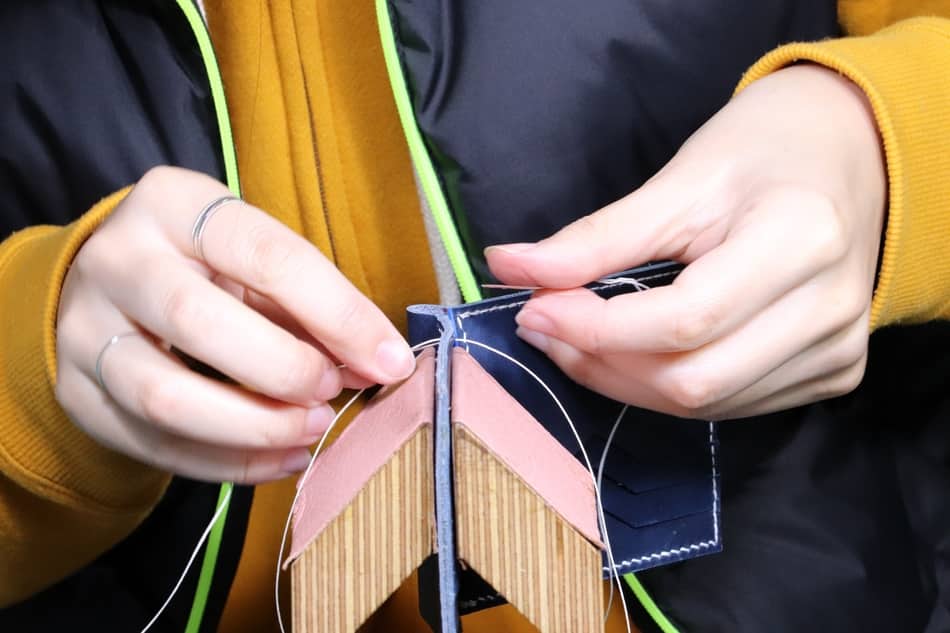
7. Saddle Stitching
Saddle stitching is one of the very common ways of sewing leather by hand. It’s possible you, just like me and many other beginners, start leatherworking if not months, weeks before getting a leather sewing machine and would have to learn some sort of hand sewing.
The Saddle stitching technique comes in handy (no pun intended) as the most popular way to sew leather by hand not only due to the share absence of a leather sewing machine but it’s also one of the most durable ways to stitch leather.
This is because this stitching technique is able to lock at every stitch you make that way if there’s any break in any section of the stitch, the threads are still able to hold up and remain undone unlike how it would when stitches are made using a sewing machine
Watch this in-depth video on: How to Do Saddle Stitching
8. Applying Finishes to Leather
Being able to finish your works in a very professional manner can be counted as an important technique you would like to figure out as early as possible when you start out in leatherwork.
Finishes are the last topcoats you will apply on your leather to preserve its dyes. Most leather finishes come premade and you can find some of them to be particularly water-resistant while others are not.
Since finishes are the last substances you put on the surface of the leather, it will not only protect the leather surface but also give it a nice gloss and enrich the leather dye colors.
Check out a video on: How to Apply Leather Finish
9. Cleaning And Conditioning Leather
Last but not least is knowing how to clean and conditional leather. Cleaning and conditioning leather are the two common ways of ensuring the leather products you make will last long maintaining a healthy look and feel.
Cleaning in leather is the activity of using mild cleaning agents like saddle soap or any mild soap to remove dirt or grime from the leather. On the other hand, conditioning is when you add or replace oils to the surface of leather after cleaning is done.
Usually, when leather is cleaned, the natural oils of the leather is lost and so must be replaced by the use of conditioners. Conditioners help make the leather retain some level of lubrication and prevents the leather from drying out and cracking.
Check out this video on How to Clean and Condition Leather
Conclusion
Leatherwork shouldn’t and isn’t as difficult as you may think. It’s all about channeling your focus on the right skills and techniques and gradually you will be able to attain heights you never dream of. From the 9 Basic leather techniques/skills discussed in this article, you can also feel free to explore on your own so techniques. Now is the perfect time to set off on this beautiful leatherwork journey. WELCOME! 😀