
If you’re just starting out in leather working, you probably understand the importance getting the right quality tools to kick start your journey. The problem is that so many quality leather work tools can amount to a hefty price within a twinkle of an eye. But don’t let that ruin your fun.
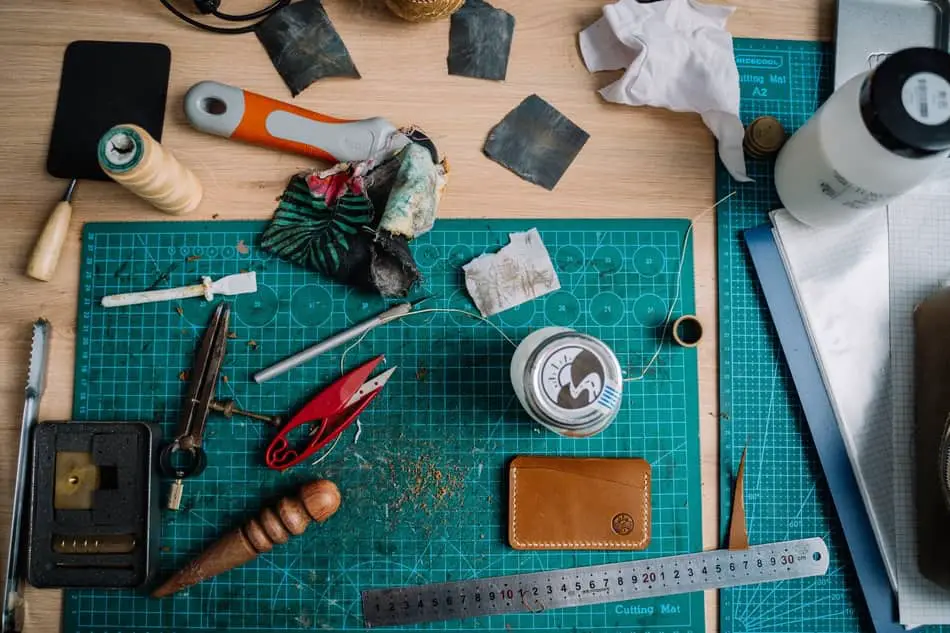
Here’s a list 6 leather working tools you will need to start leather work today;
- A Utility Knife for Leather – ($7)
- A Metal Square Ruler – ($9)
- A Leather Scratch Awl – ($4)
- A Leather Edge Beveler – ($12)
- A Leather Hand Burnisher or Leather Edge Slicker – ($10)
- A Leather Rotary Punch – ($7)
Along with its affordable price, there are a few major elements that makes these tools the most essential to start your leather work journey with.
The major aspects include characteristics of the tools, how you can use them in multiple ways, pros, cons, and other available features. I’ll talk with you about these aspects as we take a closer look at each of these tools listed.
1. Utility Knife

The utility knife in general is a very common tool and can be found in most homes and work places. It is made of a solid handle often plastic with blades you can break off, interchange or swap out when the blades dull up. The utility knife comes in different brands and is usually marketed as box cutters.
While there are some really fancy cutting tools for leather, they are really expensive and can be really hard to get into. So when you’re getting started, a low profile utility knife is a great cutting alternative.
Price:
The price for a utility knife, especially if it’s like this Utility Knife, will generally come around $5 in most supermarkets. Although this price is at a fairly low end, you won’t be disappointed with the high-quality of utility knives in this price range compared to the many others many crafters will rave about.
Uses:
The leather work craft relies heavily on cutting. Whether it’s cutting all types, weight or thickness of leather, the utility knife will come in very handy. There are various types of cuts you will be making such as slicing, whittling, heavy-weight leather cutting, detailed cuts, etc.
The best part about the utility knife apart from it being cheap and super handy is the fact that it can be used in place of tools like the exacto knives, rotary cutter, scissors, leather work shears and many other cutting tools you will be tempted to buy when starting out.
The utility knife can be used to achieve a substantial amount of delicate cuts the exacto knife is perfect for. It can also be used to make good straight cuts on think leather, just like the rotary cutter would, and so much more.
You will mostly use the utility knife with a straight edge (metal ruler). The utility knife is very easy to control especially even for an absolute complete beginner.
Pros:
- Very cheap cutting tool
- Very easy to use
- Blades are replaceable
- It’s replaceable blades are cheap to buy
- Utility knives are sharp
- It’s multipurpose
- Portable and easy to carry
Cons:
- Difficult to cut through sharp curves
- It can get very dangerous when trying to snap off a dull end.
If you’re interested, you can check out this utility knife over here on Amazon!
2. Metal Square Ruler

Leather work in general entails putting together quite a number of leather pieces and this is possible with very accurate measurements.
Also, in the initial stages of your leather work, you will be making leather projects following a lot of tutorials which will require you to get very precise measurements in order to make the articles.
So rulers are very essential to leather work. I must also add that metal square rulers, not your regular plastic or wooden rulers, are more appropriate for leather work. With a metal ruler about the length of 50cm, you’re good to take on any leather work measurements for your project.
Price:
You might have bought them before, rulers are generally not the most expensive pieces of stationary. But with specific reference to metal square rulers for leather work, that you can expect never to upgrade, you can get at a price around $11 depending on where you shop.
Uses:
When you start out in leather work, you will almost every time do all measurements, cutting, stitching, folding, etc, by hand. This makes the ruler important to leatherwork.
But what makes it especially important using a metal square ruler is because you can place it at the edges of your leather and square things up for wallets, pouches, etc to make sure the entire leather projects is nice and square when it has to be and correctly angled where necessary.
Pros:
- Makes leather work projects accurate
- Metal rulers makes hand cutting with utility knives very easy
- Can be used to mark out stitch and punch lines. (No pun intended)
Cons:
- Leather work rulers generally much be slightly longer than your everyday rulers so it can make storing and moving them about quite a pain but if you have it figured out, then there’s no question there!
If you’re interested, you can check out this metal square ruler over here on Amazon!
3. Scratch Awl


A leather scratch awl is one leather work tool that gets over looked many times but has a lot of functions. A scratch awl is essentially a pointed piece of metal mounted on a wooden handle.
These are super small leather work tools but has so much practical uses. They come in different brands with varying quality in materials.
Price:
An average scratch awl is priced around $8 but for about half the price, you will get this high-quality Scratch Awl that you can compare to any high quality scratch awl on the market.
Uses:
The basic function of the scratch awl as the name implies, can be literally used to make scratches on leather. Now, why would anyone want to scratch a perfectly natural leather surface?
Instead of using pencils, pens or probably a sharpie, you will use a scratch awl to trace out templates on leather, poking marks on leather to know cutting start points and end, mark out punch and stitch lines, draw designs or patterns on the grain surface, etc.
With a stitch awl you wouldn’t have to go through the pain of cleaning or trimming off pencil or pen marks all the time.
The scratch awl is also perfect for piercing marked out holes on leather for stitching. It can be used to ensure the stitch holes already made are perfect, thorough from one end to another and holes are in the right angle to get the best hand stitching.
The scratch awl also comes in handy when you’ve created a bunch of holes that are not wide enough. You can use the scratch awl to widen the already-made holes to make room for a particular size needle, thread or lace/thong (a very thin strip of leather used to sew)
Last but not least, in addition to using the scratch awl in place of pencils, pens, sharpie and what not, you can also use it as a leather rougher.
The leather rougher is a tool you will use to roughen the leather surface (especially the grain side(smooth surface) of the leather) when you want to glue the smooth side of leather to a rough side or two smooth leather surfaces.
The scratch awl does a fairly good job at this although the leather rougher does a much better job. Don’t worry, you will surely get an upgrade when it becomes imminent you need a Leather rougher.
Pros:
- Super cheap
- Multipurpose tool
- Require almost no care and maintenance
- Replaces the use of pencils and pens perfectly when doing leather work
- Can be used as an edge groover for stitches
- Make piercings, widening stitch holes, etc
Cons:
- Very very “prickly”. You have to be careful as you can prick your finger quite often.
If you’re interested in the leather scratch awl, you can check it out over here on Amazon!
4. Edge Beveler

The leather edge beveler generally comes with a wooden handle and a dented chisel-like cutting edge used for rounding the edges of leather. The edge beveler comes in different sizes.
Different sizes meaning, the size of the bevel on the tip of the tool. You will find the sizes usually labeled on tool in the from of numbers. The higher the number, the more trimming you’re going to get especially on thicker leather.
For a beginner, if you’re to choose just one edge beveler to start with, I will say go for a solid size 2 since you will most likely start with smaller leather work articles such card holders, key holders, wallets, and other smaller leather projects.
Price:
The leather edge beveler is not particularly expensive but comes in a lot of sizes you will eventually upgrade to that will serve specific purposes. For only one ideal size leather edge beveler, you can expect to pay on average a $12.
Uses:
A perfect size 2 leather edge beveler will serve all the purposes you will want in an edge beveler when starting out. The edge beveler has a specific task of trimming off or rounding the sharp edges of leather after the leather is cut.
You will simply run the leather edge beveler along the edges of the cut leather and it will round the edge nicely.
You will need to do this for all your projects like belts, bags, wallets, etc. This will make it very easy to polish or burnish the edges of the leather with an edge slicker. This is key because, it’s much easier to burnish or polish a round edge than a square-edged leather.
Using an edge beveler is one of the very first steps towards making your leather projects looking very professional right in the beginning stages of your leather work.
Pros:
- Makes leather projects professional looking
- Fairly cheap
- Easy to use
- Lasts very long if properly sharpened from time to time
Cons:
- With its beveled edge, it can be a bit of pain to sharpen
- As easy as it is to use, it may take a bit of time to get used to it
If you’re interested, you can check out this edge be veer over here on Amazon!
5. Hand Burnisher

A leather hand burnisher also known as an edge slicker is an edge finishing tool. This is one of the primary ways you will finish up the edges of your leather work projects.
The leather hand burnisher is basically a piece of wood with different sizes of ridge carvings or grooves you will use on the edges of your leather by rubbing to give it a nice professional finish.
Price:
The leather hand burnisher is a tool you can totally own without paying a dime. This is one of the leather work tools you can absolutely DIY. With a piece of wood and knife, you can carve out grooves similar to what’s in the picture above.
But the question is, will you be willing to trade a substantial amount of time for a tool priced below 10 bucks? If no then you will find this leather hand burnisher on Amazon very useful.
Uses:
With a simple application of water on the edges of the leather project and your hand burnisher in hand, you can as total beginner, render a really nice edge finish for your leather work projects.
While you can use the groove on the hand burnisher to slicker the edges of a your leather project to give it a professional finish, you can also use it’s rare end as a tool for moulding such as relief modeling, embossing, etc.
Pros:
- Gives the leather work a professional finish
- It’s a very simple tool
- It’s not expensive to start using it
- The hand furnished gets better and smoother with time
Cons:
- It can get tiresome when burnishing especially for people who have arthritis
If you’re interested in this tool, check it out here on Amazon!
6. Rotary Punch

The rotary punch is a punching tool with a revolving head that has different sizes of holes on it. It’s surely one of the easiest ways a beginner can make hole punches on leather for stitching, lacing, holes for setting rivets, eyelets, grommets, snaps, etc.
Price:
For less than $10 you can pick up a good rotary punch from any craft shop near you. The rotary punch is generally not a high end leather work tool so at a fairly low price the quality you will get will be top notch.
Uses:
Using the rotary punch simplifies the stitching process. You will in a matter of minutes make small holes for stitching the fastest way possible. And being able to do this very easily and quickly early on will be a true confidence booster.
There’s nothing depressing like having to do the most simplest things that seem almost impossible for your or even if possible, takes forever.
More importantly, using the rotary punch eliminates the need of mallets, mauls, poly mats, and individual punching tools in the beginning stages of leather work for beginners.
Pros:
- Can be used to make different sizes of holes suitable for different things
- Not expensive
- Very Easy to use
- Using the rotary punch eliminates the use of single punches, pricking irons, diamond chisels, mauls, mallets, etc
Cons:
- The rotary punch can only be used for holes only around the edges of the leather item
- It can cause a lot of fatigue if used for extended periods of time.
- It can only make round holes.
If you’re interested, you can check out this rotary punch over here on Amazon!
Conclusion
A little Disclaimer! This is totally a matter of preference as most people will have different recommendations, some similar to my list and others not so much.
However, this is several days of research to help you with the best of the best leather work tools you can get started with today with as little as $50.
If I’m to start leather work all over again on a really tight budget, these are the leather work tools I will personally buy. Thanks For Sticking around and I hope this post was helpful!